DIY Halloween Window Displays: Transform Your Home with Gel Stickers & Decals 👻
Halloween is just around the corner, and your windows are the perfect canvas for some spine-tingling creativity. Whether you’re hoping to wow trick-or-treaters or simply want to add a festive glow, crafting a DIY Halloween window display with gel stickers and decals is affordable, fun, and incredibly effective—no artistic skills required!
Why Choose Gel Stickers & Decals for Your Halloween Window Display?
If you want maximum Halloween impact with minimum hassle, gel stickers and decals are an unbeatable choice. These reusable, easy-to-apply decorations stick to glass without residue, making installation and removal a breeze. Plus, their translucency catches the autumn light or glows against your indoor lamps, creating a playful or eerie effect right in your window.
Benefits include:
- Endless possibilities – Layer, overlap, or frame your stickers to suit any theme.
- Safe & mess-free – No sharp objects, glues, or paints—ideal for families.
- Reusable & repositionable – Adjust designs as you like or save them for next year.
- Suitable for any window size – From small panes to sprawling bay windows.
What You’ll Need for Your DIY Halloween Window Display
With only a few essentials, you’re ready to get creative. Gather the following:
- Halloween-themed gel sticker sets (bats, pumpkins, spiders, ghosts, black cats, haunted houses).
- Vinyl window decals (witch silhouettes, cobwebs, skeletons, “Happy Halloween” lettering).
- Spray bottle with water and a soft cloth for window prep.
- Optional: LED candles, fairy lights, or backlighting for dramatic effect.
- Camera or smartphone to capture your handiwork.
You’ll find creative sticker set options featuring vibrant colours and glow-in-the-dark styles—brilliant for spooking up a window from dusk onwards!

Step-by-Step: Create Your Own DIY Halloween Window Display
Unsure where to start? Follow this foolproof guide for a winning Halloween scene.
1. Plan Your Halloween Window Theme
Begin by envisioning how you want your window to look. Do you prefer cute and kid-friendly, or chilling and mysterious? Here are a few popular window theme ideas:
- Classic pumpkin patch – Layer grinning jack-o’-lanterns with autumn leaves.
- Spooky graveyard – Combine headstones, lurking ghosts, and bats circling above.
- Witch’s lair – Arrange witch hats, bubbling cauldrons, and black cats for a magical touch.
- Monster mash – Feature a mix of friendly monsters, eyeballs, and spider webs.
Lay out your stickers and decals on the table to experiment with combinations before committing to the glass.
2. Prep Your Windows for Sticker Magic
Clean glass ensures your Halloween decals stay firmly in place and really catch the light.
- Wipe the window with a damp, lint-free cloth and mild detergent if needed.
- Dry with a microfiber cloth for a streak-free surface.
- For vinyl decals, a light spritz of water allows for easy adjustment before the final press.
This extra step prevents dust or fingerprints from spoiling your haunting handiwork.
3. Arrange Your Biggest Stickers First
Start with the larger feature pieces—haunted houses, “Happy Halloween” script, or imposing witches. Big stickers make a bold centrepiece and set the tone for the display.
- Place them at eye level for the most impact from outside.
- For multi-pane windows, think about how your design flows across the frames.
- Try positioning oversized stickers off-centre for an artful, less formal effect.
4. Fill in with Smaller Details
Accent your scene with pumpkins, bats, spiders, or flocking ghosts. Work around your centrepieces or let clusters creep up window edges.
- Overlap clear or translucent gel stickers for a textured, “layered” look.
- Use lots of smaller elements for a ‘swarm’ effect—think bats fluttering upwards or spiders descending.
- Space elements thoughtfully: clusters of three or five often look balanced and pleasing.
5. Add Depth & Personality
To really make your DIY Halloween window display stand out, play with depth and light:
- Stick some elements on the room-side or even dangle a few (with fishing wire) for a three-dimensional effect.
- Backlight with LED candles or fairy lights placed safely on the windowsill.
- For extra ‘wow’, outline shapes with a string of orange or purple fairy lights.
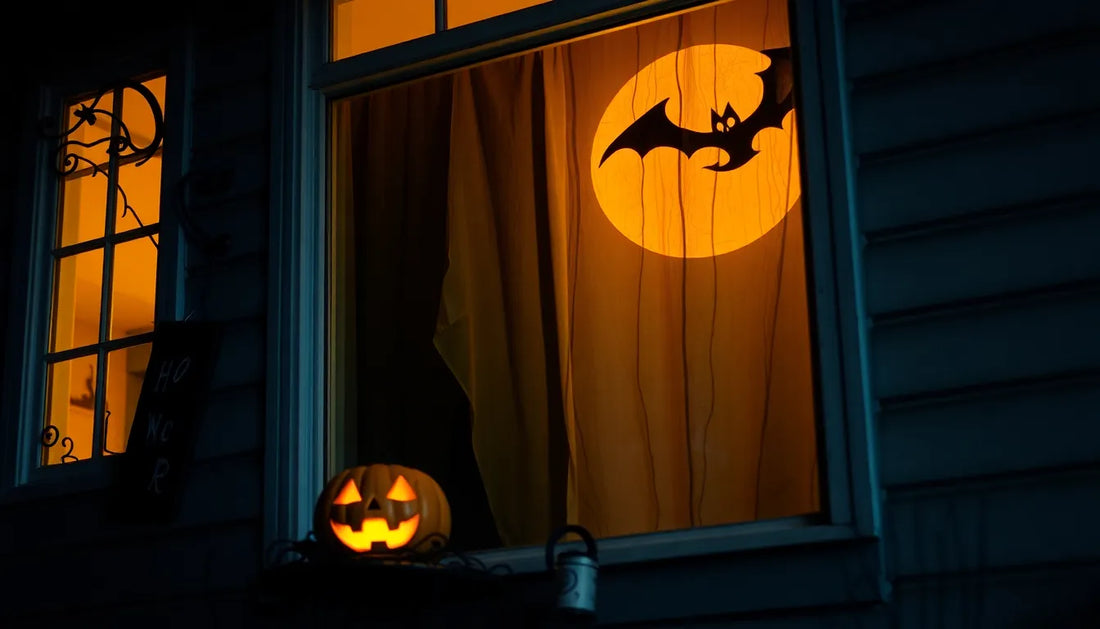
At night, your window will glow with a magical or spooky scene, drawing plenty of attention.

Styling Tips for a Show-Stopping Halloween Window
An eye-catching display isn’t just about what you stick—it’s how you style it.
- Symmetry vs. asymmetry: Try a symmetrical scene for order, or embrace a wild, scattered look for extra spookiness.
- Create a story: Arrange your stickers to tell a tale—a witch flying toward her haunted house or ghosts chasing pumpkins.
- Use colour blocks: Balance bright orange pumpkins opposite shadowy black bats and midnight-blue backgrounds.
- Frame the view: Line your window borders with cobwebs, vines, or string-light borders for a finished, professional touch.
- Get everyone involved: Let family members or children contribute their favourite elements for a truly personal vibe.
Getting Inspired by Seasonal Light
Natural autumn light changes throughout the day. Early mornings will catch the stickers in a soft, golden hue, while evenings can be wonderfully dramatic—ideal for backlit displays that come alive as night falls.
Tips to Maintain & Reuse Window Stickers
Quality gel stickers and decals can last for many Halloweens with a little care.
- To remove: Gently peel each sticker from the glass. Use a damp cloth to wipe off any residue.
- Storing: Stick gel pieces onto the original plastic backing or wax paper, and keep flat in a cool, dry place.
- Cleaning: If dust or lint collects, wash gently in lukewarm water. Let them air-dry before storing.
- Reuse: Next Halloween, simply clean your window and apply again—just as vivid as before.
Capture & Share Your DIY Halloween Window Display
Don’t forget to snap a photo once your masterpiece is complete! Take pictures from outside as well as inside; dusk is ideal for dramatic lighting. Share your creation on social media or invite neighbours over to view your handiwork, spreading the Halloween spirit.
A few tips for the best photos:
- Turn off indoor lights for external shots to highlight the stickers.
- Backlight the window from inside with an LED candle or fairy lights.
- Shoot at dusk for a perfect ‘glow’ effect.
- Document the process to encourage friends (and next-year-you) to try new designs.
Troubleshooting Common Window Sticker Problems
If you run into issues, here’s how to get your display back on track.
Stickers Won’t Stick?
- Ensure glass is thoroughly cleaned and dry.
- Use a tiny spritz of water for vinyl decals, then smooth with a card.
- Press gel stickers gently but firmly, especially on cold glass.
- If the sticker keeps peeling, warm it in your hands to increase flexibility.
Cloudiness or Bubbling?
- Smooth air bubbles gently with your finger or a soft card.
- For persistent cloudiness, carefully remove the sticker, wash off any dust, and reapply.
Gel stickers are designed for repeated use, so don’t hesitate to adjust until satisfied.
Conclusion
Creating a DIY Halloween window display with gel stickers and decals is simple, rewarding, and perfect for unleashing your festive spirit. Gather your supplies, let your imagination run wild, and transform your home into a Halloween masterpiece everyone will love.
Ready to get spooky? Shop our latest Halloween sticker sets and start decorating today!